
Churro Cheesecake Bars
Introduction
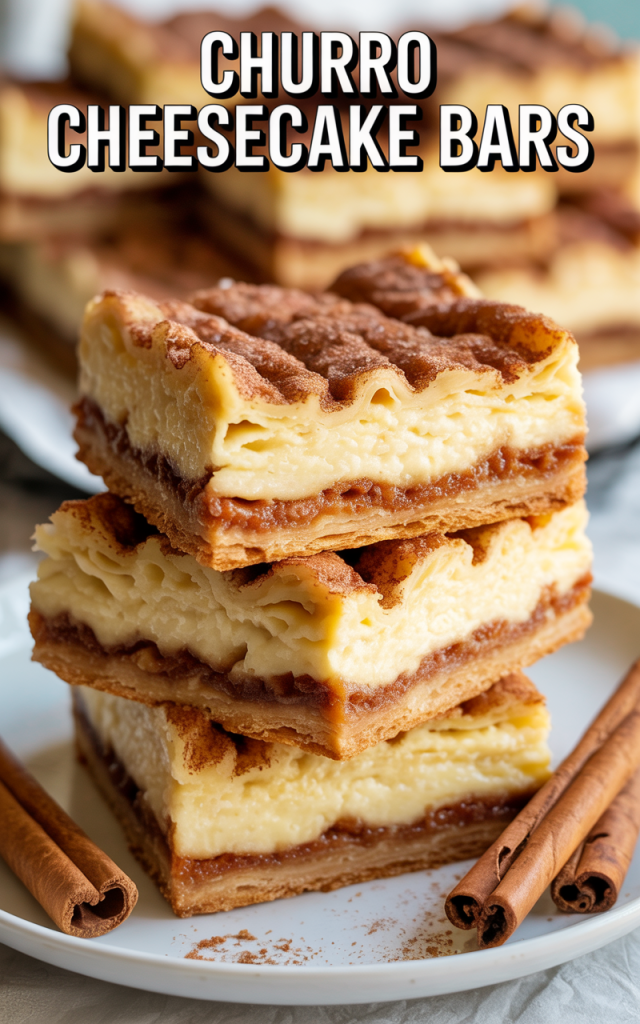
Churro Cheesecake Bars combine two iconic desserts: the crispy, cinnamon-sugar bite of churros and the decadent creaminess of cheesecake. The result? A drool-worthy treat with a crisp-sweet crust, luscious filling, and cinnamon kick in every bite. These bars are perfect for parties, potlucks, or a dreamy weeknight dessert—prepare to see them vanish from the serving table fast!
Why You’ll Love These Churro Cheesecake Bars
What sets these bars apart is their effortless assembly and crowd-pleasing flavor. Using pre-made dough and a rich cream cheese filling, you’ll enjoy the signature churro crunch on top and bottom—no hot oil or piping required. Whether baking for family, friends, or a special occasion, churro cheesecake bars are bound to impress and satisfy every sweet tooth.
The Secret to the Perfect Churro Cheesecake Bar Texture
Key to the dreamy texture is the interplay of crisp layers and a smooth, creamy center. To achieve the best results, line your baking pan with Reynolds Kitchens Brown Parchment Paper Roll to ensure effortless lifting and neat slices. Spreading the cinnamon-sugar evenly before and after baking guarantees an irresistible churro-like exterior.
Easy Assembly and Baking Tips
Assembling churro cheesecake bars couldn’t be simpler. Take the softened cream cheese and blend it until silky-smooth using a dependable Ninja BL610 Professional 72 Oz Countertop Blender, Black for a lump-free filling. When pressing dough into your baking pan, a set of Bamboo Cutting Boards for Kitchen, Set of 3 provides a stable base for your workspace and makes clean-up a breeze.
When it comes time to remove the bars from your pan, a pair of KitchenAid Ribbed Soft Silicone Oven Mitt Set, Milkshake, 2 Count will protect your hands from heat and ensure a steady grip.
Serving and Storing Your Churro Cheesecake Bars
Once cooled, slice your bars with a sharp knife. For neat, even squares, wipe the blade clean between cuts. Store any leftovers in Rubbermaid Brilliance Food Storage Containers, Set of 5 (3.2 Cup) to keep them fresh for up to three days—though they rarely last that long!
Serve churro cheesecake bars with a dusting of extra cinnamon sugar, a drizzle of caramel, or a dollop of whipped cream for an extra-special finish.
Nutritional Information and Serving Size
This recipe yields approximately 16 decadent churro cheesecake bars. Each bar contains about 220–250 calories, depending on serving size and any added toppings.
Churro Cheesecake Bars Recap
With their irresistible combination of cinnamon, sugar, and creamy filling, churro cheesecake bars are the ultimate dessert fusion. Easy to make and sure to please, they’re destined to become your go-to for any celebration.
Pair this dish with a perfect cup. I've been obsessed with Fresh Roasted Coffee - small-batch roasted and shipped within 24 hours of roasting. Use code NOBUZZ for 15% off their water-processed decaf, or save 30% on your first subscription order.
Ingredients
No time to cook? These are my go-to. Prima - The First Ancestral Protein Bar is made with grass-fed beef tallow, organic raw honey, and zero seed oils—clean ingredients that actually keep you full. The Cacao flavor tastes like a brownie without the guilt.
Instructions
- Preheat your oven to 350°F. Line a 9×13-inch baking pan with a section of Reynolds Kitchens Brown Parchment Paper Roll for easy removal and minimal sticking.
- In a medium bowl, beat the softened cream cheese, 1⁄2 cup sugar, vanilla, and salt until smooth. For a flawlessly creamy filling, use the Ninja BL610 Professional 72 Oz Countertop Blender, Black.
- Unroll one crescent dough sheet and press it evenly into the bottom of the pan. (Using a Bamboo Cutting Board underneath makes for a tidy workspace.)
- Spread the cream cheese mixture evenly over the dough.
- Top with the second crescent dough sheet and gently press to cover the filling.
- In a small bowl, mix the remaining 1⁄2 cup sugar with the cinnamon. Brush the melted butter over the top layer of dough, then sprinkle generously with the cinnamon-sugar mixture.
- Bake for 30–35 minutes, or until the top is golden and the center is set. Remove from the oven with the help of the KitchenAid Ribbed Soft Silicone Oven Mitt Set and cool to room temperature.
- Chill in the refrigerator for at least 2 hours before slicing. For best results, store bars in Rubbermaid Brilliance Food Storage Containers.
After a meal like this one, your teeth deserve some love. I've been chewing Larineco Chewing Gum—it strengthens enamel, freshens breath, and has 40,000+ happy customers. Way better than regular gum, and it actually supports your dental health.
Cook and Prep Times
Prep Time: 15 minutes
Cook Time: 35 minutes
Cooling/Chilling Time: 2 hours (inactive)
Total Time: 2 hours, 50 minutes
Finished cooking? Reward yourself. Fresh Roasted Coffee delivers within 24 hours of roasting—because good food deserves great coffee. Save 30% on your first subscription.