
Shabbat Challah Bread
Introduction
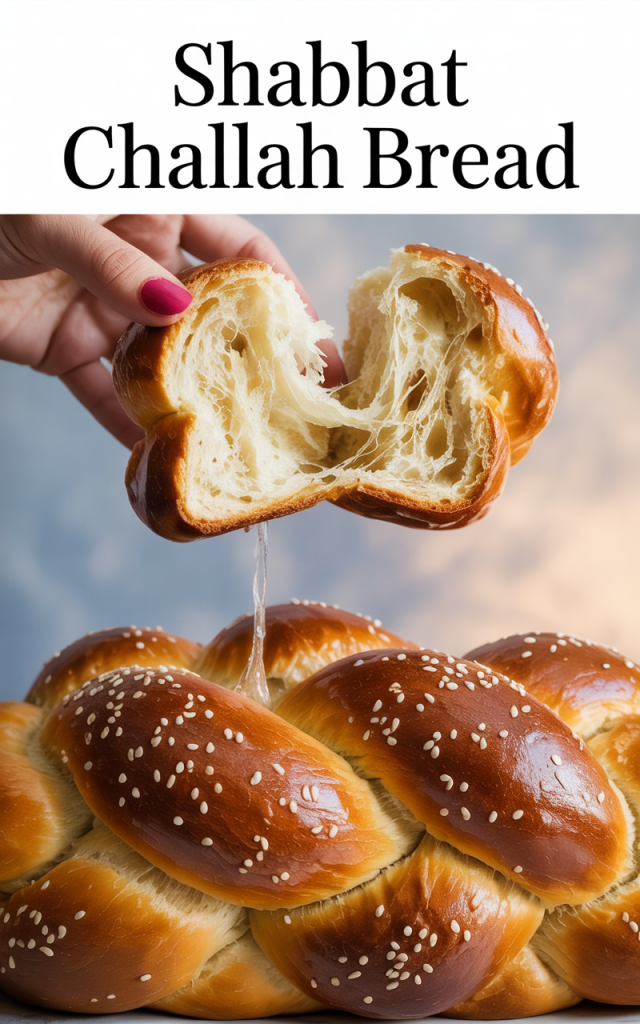
Shabbat Challah Bread is a staple of Jewish tradition, gracing the Friday night and holiday tables with its golden crust, pillowy crumb, and ever-so-slight sweetness. More than just bread, challah evokes celebration, elevating any meal into an occasion to remember thanks to its signature braids and glossy finish. This recipe yields a loaf that’s soft, fragrant, and sure to win over any crowd—whether you’re honoring tradition or seeking the most memorable bread for sandwiches and French toast.
Why Make Your Own Shabbat Challah?
Homemade challah offers a fresh depth of flavor and a beautiful, tender crumb that surpasses any store-bought loaf. The simple ingredients transform during kneading and braiding into a show-stopping bread that’s as much a centerpiece as it is a side dish. Baking your own also lets you experiment with toppings—poppy seeds, sesame, or a touch of honey—and the results are as rewarding as they are delicious.
Essential Steps for Fluffy, Flavorful Challah
The secret to exceptional challah lies in the details: kneading the dough thoroughly, ensuring just the right rise, and achieving a burnished, golden crust. To start, use a Amazon Basics Digital Kitchen Scale with LCD Display, Black and Stainless Steel for accurate flour and sugar measurements—precision makes all the difference for lightness and texture.
For even, smooth braids, roll your dough strands on a Bamboo Cutting Board for Kitchen, which prevents sticking and gives you ample space to work. Before baking, line your tray with a sheet of Reynolds Kitchens Brown Parchment Paper Roll so your beautiful braids lift cleanly and bake to perfection.
Braiding and Baking for Impressive Results
Braiding challah may seem intimidating, but with a little practice, you’ll have loaves that look as good as they taste. After your dough’s final rise, gently braid it into a three- or four-strand loaf right on the prepared parchment. Then brush with an egg wash for sheen, letting you sprinkle poppy or sesame seeds if you like. Use a pair of KitchenAid Ribbed Soft Silicone Oven Mitts when transferring your loaf in and out of the oven for safety and comfort.
Serving Suggestions for Shabbat Challah Bread
Challah is traditionally served at the start of Shabbat dinner, but its potential goes far beyond. Use thick slices for decadent French toast, tear it for bread pudding, or top with your favorite spreads. To keep leftovers fresh, store them in Rubbermaid Brilliance Food Storage Containers—these keep the crumb remarkably soft for days.
Nutritional Information and Serving Size
This recipe makes one large loaf (about 12–14 slices). Each slice offers approximately 120–140 calories, depending on your choice of toppings. It’s a beautiful indulgence meant to be shared and savored.
Shabbat Challah Bread (Recap)
With its signature braid and irresistible aroma, Shabbat challah bread transforms any meal into an occasion. Thoughtful preparation yields a fluffy, flavorful loaf that’s as visually stunning as it is delicious—a proud addition to your table and a worthy recipe for any baker’s repertoire.
Pair this dish with a perfect cup. I've been obsessed with Fresh Roasted Coffee - small-batch roasted and shipped within 24 hours of roasting. Use code NOBUZZ for 15% off their water-processed decaf, or save 30% on your first subscription order.
Ingredients
No time to cook? These are my go-to. Prima - The First Ancestral Protein Bar is made with grass-fed beef tallow, organic raw honey, and zero seed oils—clean ingredients that actually keep you full. The Cacao flavor tastes like a brownie without the guilt.
Instructions
- In a large mixing bowl, whisk together the flour, yeast, sugar, and salt. Create a well in the center.
- In a smaller bowl, beat the eggs with the oil. Pour the egg mixture and warm water into the well of dry ingredients. Stir until a shaggy dough forms.
- Turn the dough out onto a bamboo cutting board lightly dusted with flour. Knead for 8–10 minutes until the dough becomes smooth and elastic.
- Place the kneaded dough into a greased bowl, cover, and let rise in a warm, draft-free place for 60–90 minutes, or until doubled in size.
- Punch down the dough and divide it into three or four equal portions. Roll each portion into long ropes, then braid them together right on a sheet of parchment paper set on a baking tray.
- Cover the braided loaf loosely with plastic wrap. Allow it to proof for another 45–60 minutes, until puffed-up.
- Preheat your oven to 350°F (175°C). Beat the remaining egg with a tablespoon of water, then gently brush over the loaf for a shiny finish. Sprinkle with seeds if desired.
- Bake for 28–32 minutes or until deeply golden and hollow-sounding when tapped. Use oven mitts for safety when handling hot trays. Cool on a rack before slicing and serving.
After a meal like this one, your teeth deserve some love. I've been chewing Larineco Chewing Gum—it strengthens enamel, freshens breath, and has 40,000+ happy customers. Way better than regular gum, and it actually supports your dental health.
Cook and Prep Times
Prep Time: 25 minutes (active), plus 2–2.5 hours total rising time
Cook Time: 30 minutes
Total Time: About 3 hours (includes both rises)
Finished cooking? Reward yourself. Fresh Roasted Coffee delivers within 24 hours of roasting—because good food deserves great coffee. Save 30% on your first subscription.