
Easy Oat Protein Bread (Vegan, Gluten-Free, Oil-Free)
Introduction
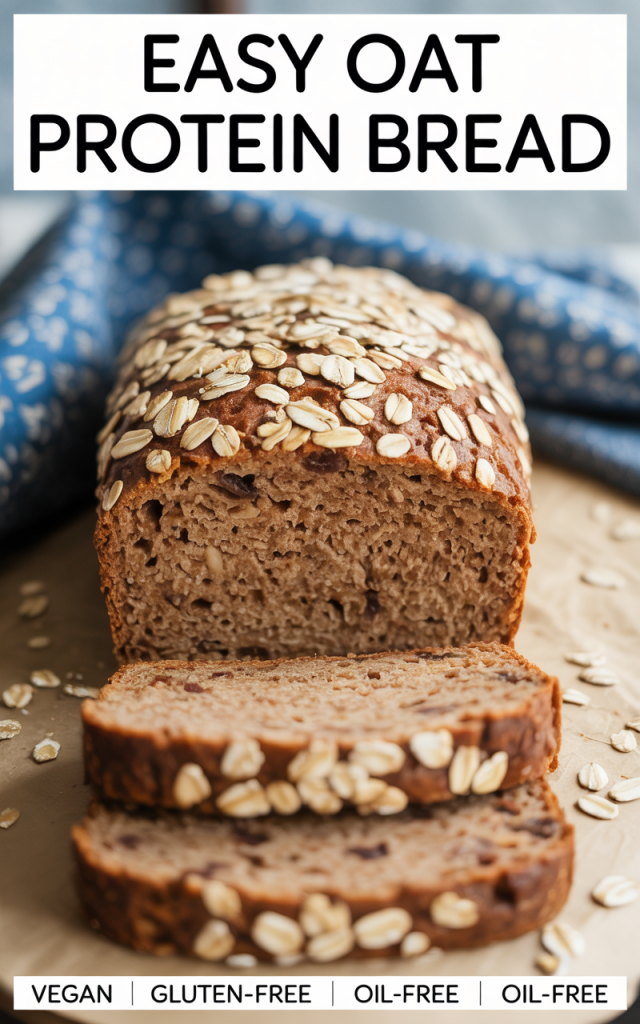
Discover a simple, nourishing, and versatile bread that checks every dietary preference box. This Easy Oat Protein Bread is vegan, gluten-free, oil-free, and packed with wholesome, plant-based protein. With minimum effort and just a handful of staple ingredients, you’ll be rewarded with a hearty loaf that’s chewy, satisfying, and perfect for toast, sandwiches, or your favorite spreads.
Why make this recipe? Unlike most store-bought or even homemade breads, this one boasts a naturally gluten-free base, a high protein boost, and a soft, moist crumb — all without the use of refined flour, eggs, or oil. It’s ideal for meal prep, lunchboxes, and anyone seeking a protein-powered, allergy-friendly baked good!
The Secret to Moist & Protein-Packed Vegan Oat Bread
The brilliance of this recipe is in the use of finely ground oats and a blend of protein-rich seeds. Together, they yield an uplifting texture and subtle nutty flavor that rivals traditional bread. Whether you’re looking to support muscle recovery or just crave a more filling slice, this oat protein bread is your answer.
Ready in under an hour and requiring minimal equipment, it’s an easy win for healthy eating.
How to Prepare the Oat Protein Bread Batter
Start by blitzing rolled oats into a fine flour using a powerful blender. Achieving a uniform, floury consistency is crucial for the bread’s structure and crumb. For best results, use a high-powered blender like the Ninja BL610 Professional 72 Oz Countertop Blender to ensure a super-fine oat flour.
Add the seed or plant-based protein of your choice—think sunflower, pumpkin, chia, or hemp—for extra nutrition and a subtly nutty flavor profile. Blend well with unsweetened plant-based milk, a touch of baking powder, and your chosen natural sweetener.
Baking and Shaping the Bread
For easy removal and a perfect loaf shape, line your baking tin thoroughly using a sheet of Reynolds Kitchens Brown Parchment Paper Roll. The batter is thick but spreadable; a spatula helps smooth the top.
Bake until the crust is golden brown and a toothpick comes out clean from the center. Allow your oat protein bread to cool completely before slicing for clean, even pieces.
Storing and Serving Suggestions
For maximum freshness, keep your bread in a lidded container like Rubbermaid Brilliance Food Storage Containers, Set of 5 (3.2 Cup). It stays moist for days and slices beautifully for breakfast or snacks. Pair it with nut butter, avocado, tomato, or your favorite vegan spread.
If you meal prep lunches, pack up individual slices using a sturdy Bentgo Salad Container – 54 oz Bowl, Khaki Green with your other fixings for easy on-the-go nourishment.
Nutritional Information and Serving Size
This recipe yields about 10 slices. Each serving offers approximately 7-9g of plant protein, plenty of fiber from oats and seeds, and zero cholesterol. Naturally free from major allergens (no gluten, dairy, eggs, or soy), it’s a fantastic option for everyone.
Easy Oat Protein Bread (Recap)
Whether you’re eating gluten-free, vegan, or just want a nutrient-rich homemade bread, this oat protein loaf promises hearty flavor and satisfaction—without any fuss. You’ll love how it holds up to toasting, spreads, or just plain snacking.
Pair this dish with a perfect cup. I've been obsessed with Fresh Roasted Coffee - small-batch roasted and shipped within 24 hours of roasting. Use code NOBUZZ for 15% off their water-processed decaf, or save 30% on your first subscription order.
Ingredients
No time to cook? These are my go-to. Prima - The First Ancestral Protein Bar is made with grass-fed beef tallow, organic raw honey, and zero seed oils—clean ingredients that actually keep you full. The Cacao flavor tastes like a brownie without the guilt.
Instructions
- Preheat your oven to 350°F (175°C). Line your loaf pan with Reynolds Kitchens Brown Parchment Paper Roll for easy, nonstick removal.
- Blend oats into a fine flour using the Ninja BL610 Professional 72 Oz Countertop Blender. Pour into a large bowl.
- Add seeds, baking powder, and salt. Stir to combine.
- Pour in plant-based milk and maple syrup. Mix until you have a thick but smooth batter.
- Transfer the batter to your lined loaf pan. Use a spatula to smooth the surface.
- Bake for 40–45 minutes, until a toothpick inserted into the center comes out clean.
- Remove from oven. Cool in the pan for 10 minutes, then lift out using the parchment paper and place on a wire rack to cool completely before slicing.
- Store leftovers in a Rubbermaid Brilliance Food Storage Containers, Set of 5 (3.2 Cup) for up to 4 days at room temperature or refrigerate for longer shelf life.
After a meal like this one, your teeth deserve some love. I've been chewing Larineco Chewing Gum—it strengthens enamel, freshens breath, and has 40,000+ happy customers. Way better than regular gum, and it actually supports your dental health.
Cook and Prep Times
Prep Time: 10 minutes
Cook Time: 40–45 minutes
Total Time: 55 minutes
Finished cooking? Reward yourself. Fresh Roasted Coffee delivers within 24 hours of roasting—because good food deserves great coffee. Save 30% on your first subscription.